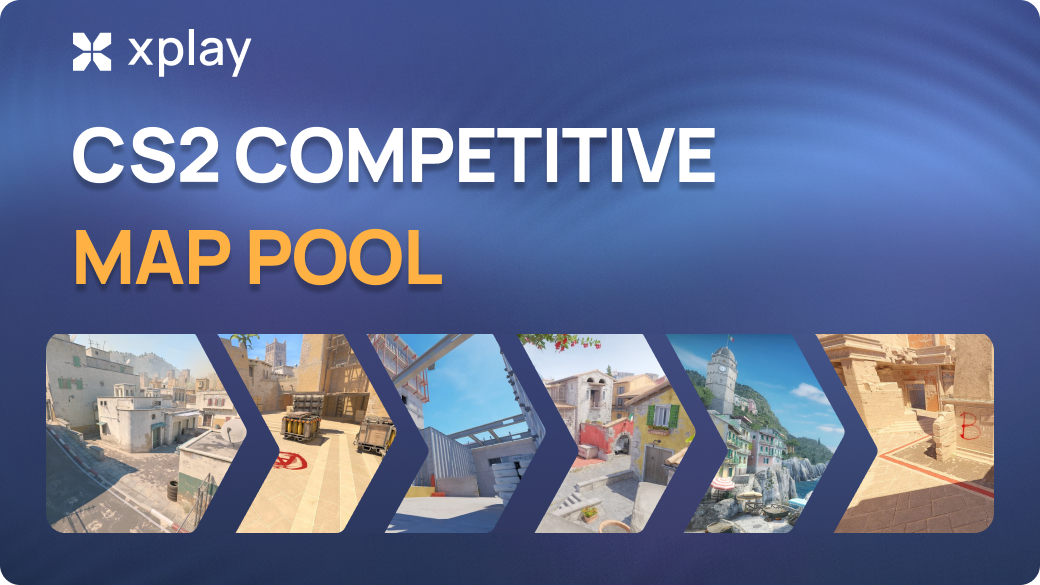
CS2 Competitive Map Pool 2026: Active Duty List

In the competitive structure of CS2, there are various maps that you can use to play the game. We also know that many of these maps have complex area names. For example, in Dust 2, you've often heard place names such as "Long Doors" or "Upper Tunnels".
To defeat your opponent in CS2, you must fight in harmony with your team. The most important thing is to give your teammates accurate location information and know map strategies.
We will cover common key locations and strategies for each competitive map in CS2
On xplay.gg servers you can play on any CS2 competitive maps. You can choose between normal competitive mode, 2 on 2 or AWP DM mode. Everything you want is already available on xplay.gg servers.
And bonus you can try any skin through Skinchanger. Read more about it: CS2 Skins Inspect Servers.
Premier Season 4 – January 2026
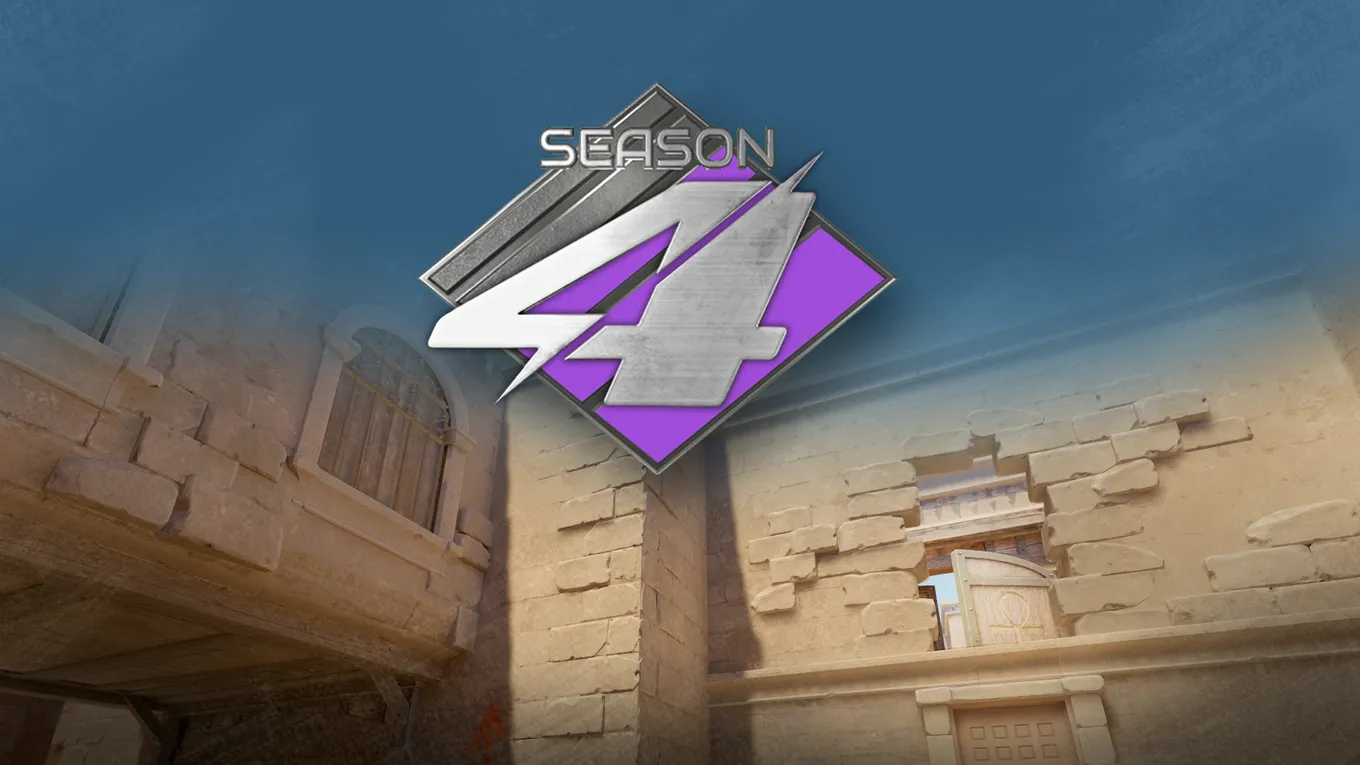
Premier Season 4 officially launched on January 22, 2026, marking one of the most significant competitive updates in CS2’s early 2026 lifecycle. Premier mode received a full seasonal reset with updated progression, a refreshed map pool, gameplay adjustments, and new cosmetic rewards tied directly to active play and weekly drops.
With the start of Season 4, Anubis returned to the Active Duty / Premier competitive map pool, replacing Train, and came with structural layout changes that impact mid control, rotations, and utility approaches.
Season 4 also brought balance tweaks to core gameplay. Submachine guns such as MP7 and MP5‑SD received increased damage, reduced damage fall‑off, and a $100 price reduction, while PP‑Bizon also became cheaper. These changes aim to make SMGs more viable in eco and force‑buy rounds.
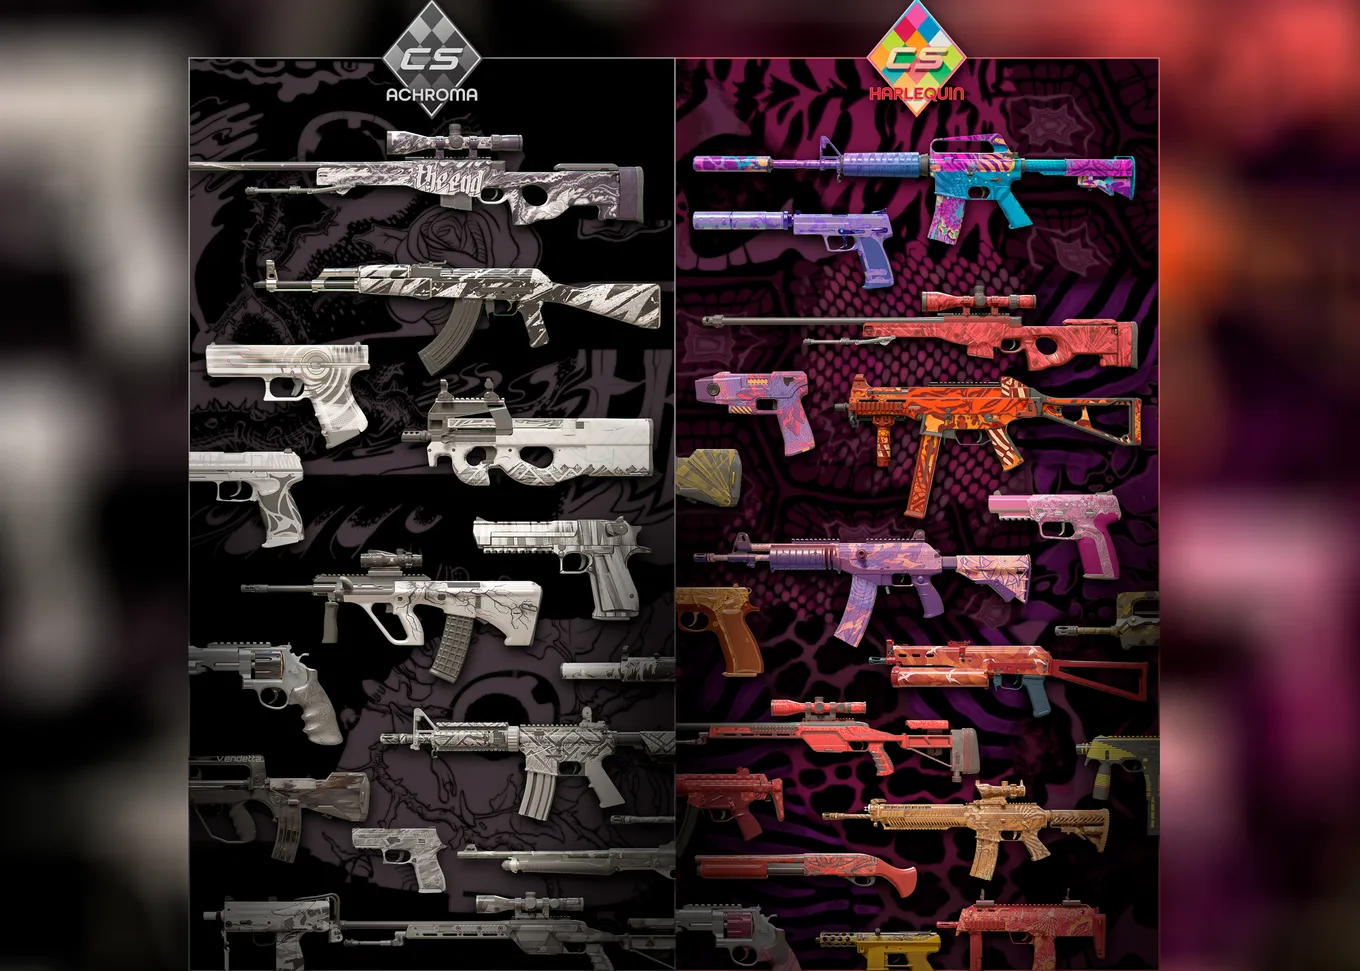
One of the most visible additions for players are the new Weekly Care Package weapon collections introduced in premier drop rotation:
- Harlequin Collection — vibrant and colorful skins with bold finishes designed by Valve.
- Achroma Collection — minimalist black‑and‑white themed skins with a clean, contrasting visual style.
On March 12, 2026, CS2 received the “Dead Hand” update, introducing a fresh batch of cosmetic content. For a full overview of all skins and gloves in the “Dead Hand” update, xplay.gg has a detailed article: CS2 Update “The Dead Hand”: New Skins & Gloves.
In addition to weekly drops, a limited‑edition weapon skin — AK‑47 | Aphrodite — was added to the Armory Pass, featuring distinctive visual variation based on pattern seed and float values.
CS2 Competitive Map Pool (Premier / Active Duty 2026)
As of January 2026, Valve updated the Active Duty map pool. Train has been removed, and Anubis has returned.
Premier / Active Duty maps:
- Mirage
- Inferno
- Nuke
- Ancient
- Anubis
- Dust II
- Overpass
New & Community Maps
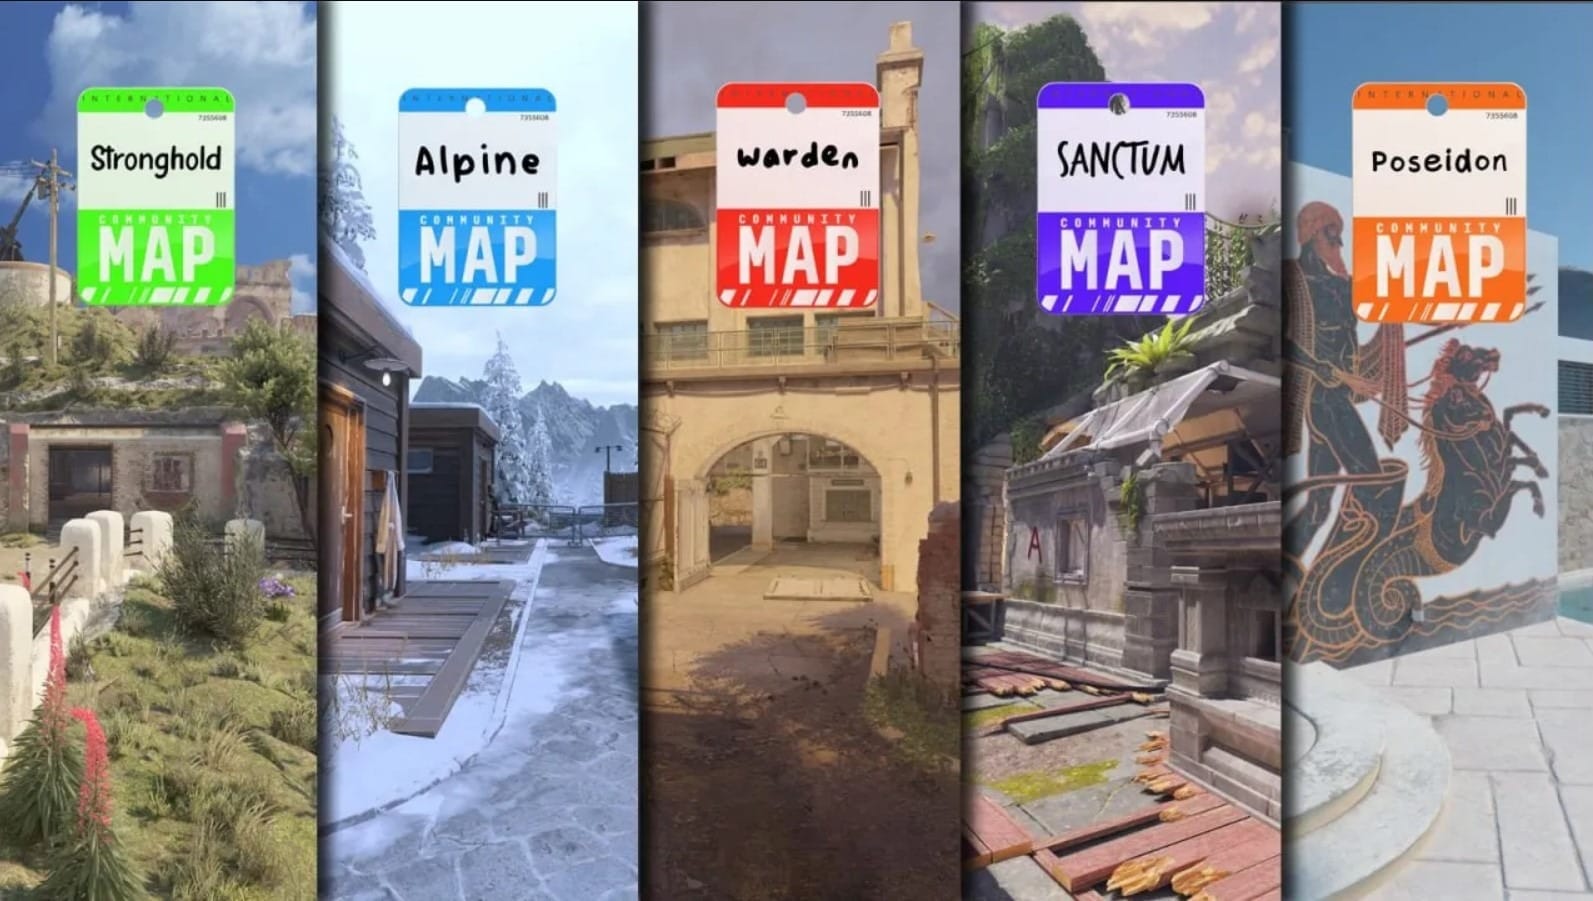
In addition to the standard competitive pool, CS2 received a significant content update with Premier Season Four in January 2026, introducing a set of new community‑created maps across various game modes.
Valve removed older community maps like Palacio, Golden, Rooftop, and Agency, and replaced them with five fresh community maps that expand the gameplay beyond the usual Active Duty selection.
- Stronghold – A fortress‑like defusal map set among the historic bunkers and tunnels of Gibraltar, with vertical gameplay and tight chokepoints. Stronghold is playable in Competitive, Casual, and Deathmatch modes and emphasizes control of central mid areas and split pushes from multiple angles.
- Alpine – A snowy high‑altitude hostage map taking place on a luxurious mountain resort. Alpine reimagines classic hostage rescue scenarios with long sightlines, open ski resort terrain, and close‑quarters indoor firefights. This map is also available in Competitive, Casual, and Deathmatch.
- Warden – Inspired by an old prison island, Warden features an open layout with large outdoor areas and structural chokepoints. The map is designed for Competitive, Casual, and Deathmatch, and focuses on mid‑to‑site rotations, long lines of sight, and varied cover positions that obligate teams to coordinate utility and positioning.
- Poseidon – Exclusive to the Wingman (2v2) mode, Poseidon is themed around a Greek island spa‑style resort with beachfront corridors and multiple layered combat zones. Its layout rewards quick rotations, high ground control, and tight tactical engagements in small team encounters.
- Sanctum – Also a Wingman‑only map, Sanctum places players amid the ruins of an ancient jungle temple. With narrow routes, layered verticality, and compact sightlines, Sanctum offers fast‑paced 2v2 combat that requires precise communication and swift positional reads.
Detailed Breakdown of Each Map
Mirage: Strategies and Key Locations
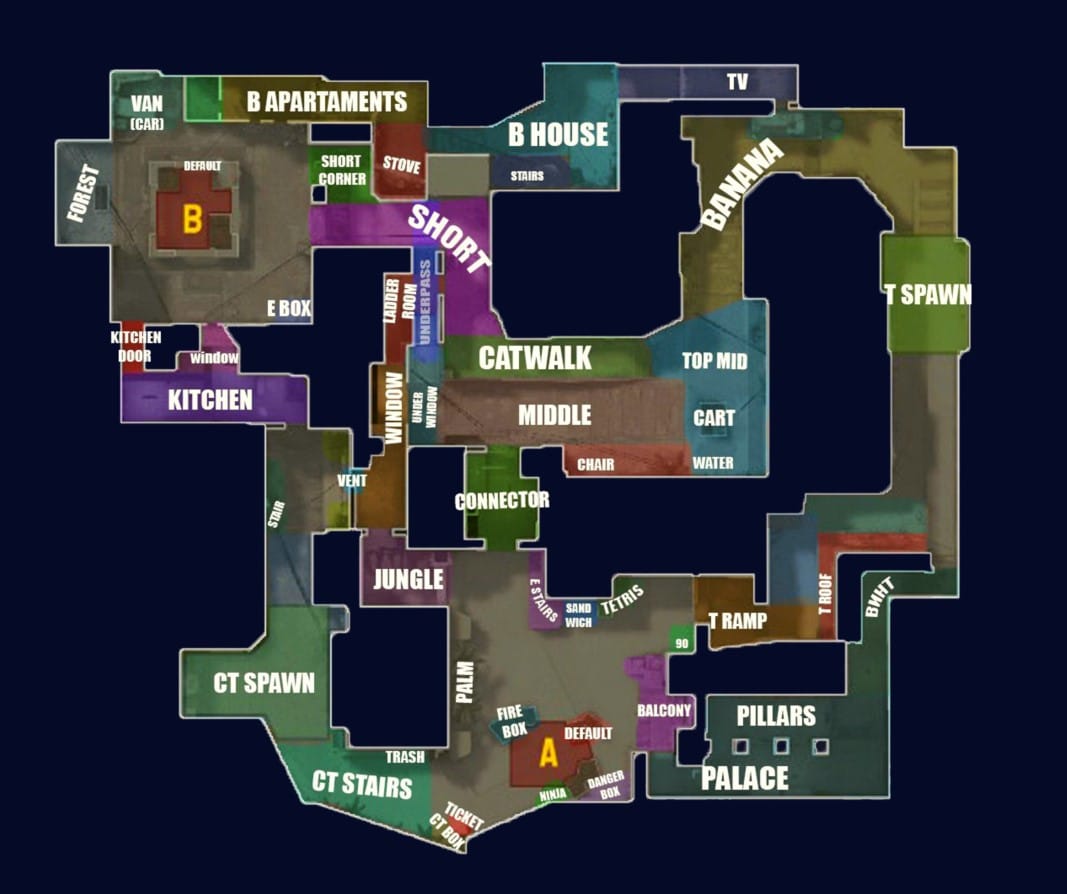
CT-Side Strategies
CTs usually place two players on A (one at Ticket/Palace, one at Jungle/CT), one player at Mid (often with an AWP in Window), and two on B (one at Van/Bench, one at Short/Catwalk). A-site defenders split between Ticket/Palace and Jungle/CT, providing support to Mid and A Site when needed. B-site players cover Van/Bench and Short/Catwalk, ready to rotate to Mid or support each other with utility.
Controlling Apartments and maintaining vision on B Short is critical. Depending on T movements, holding B requires using smokes, molotovs, and flashes effectively while balancing aggression and safe positioning.
One player at B should watch Short/CT carefully and delay enemy pushes as long as possible to give teammates time to rotate. Avoid unnecessary deaths — your main goal is to hold angles and provide information for your team.
Control of Mid is vital. The Window player must be aware of smokes blocking vision and be ready to rotate quickly to Connector or Ladder Room if necessary.
T-Side Strategies
One standard T-side setup is: three players focused on A (through A Main and Palace), one player holding Top Mid (Window/Connector), and one player supporting B via Apartments or Short. Top Mid control allows Ts to pressure both A and B and cut rotations.
Another common T-side setup involves two players in Apartments, one controlling aggression on Mid, and the remaining players attacking A through Palace or A Main.
After taking control of Mid and Banana, Ts have several options:
- A split execute: three players push A Main, one through Palace, and one via Connector/Top Mid.
- A Short push: concentrating forces on Short with additional support from Apartments.
- B split: three players push CT to B while two push Banana.
- Fake A via Mid and then execute full B with coordinated smokes and molotovs to isolate defenders.
Timing, communication, and proper use of utility are essential for all pushes and executes.
Inferno: Strategies and Key Locations
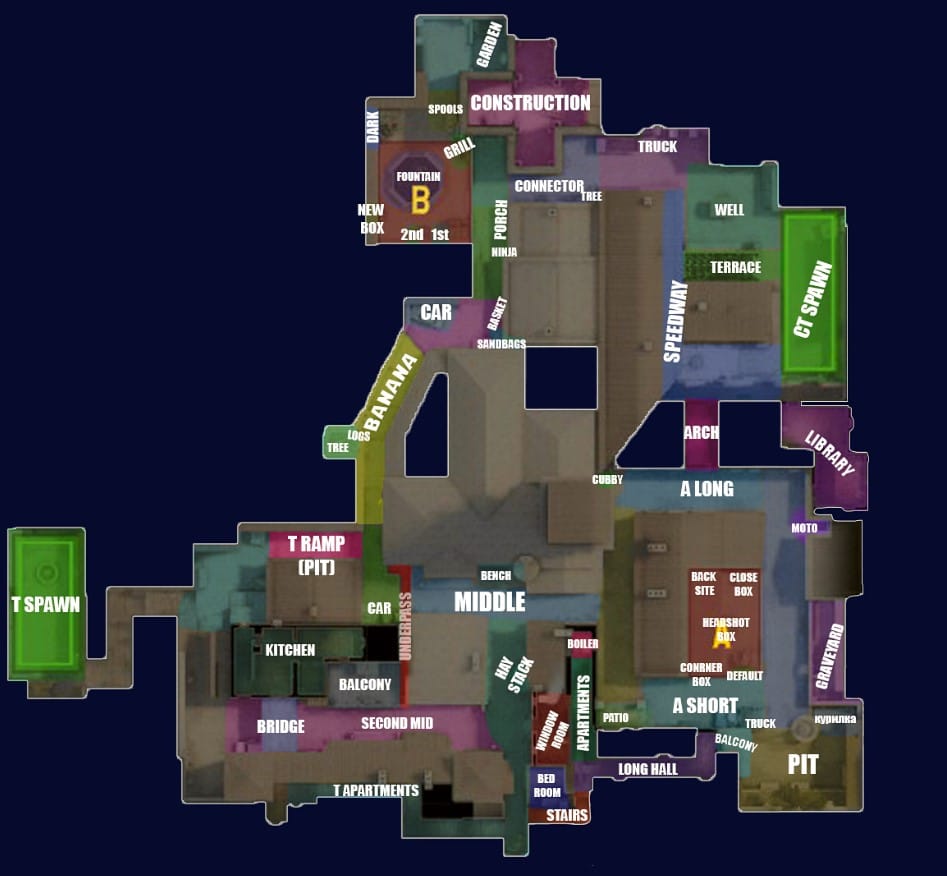
Winning on Inferno requires a deep understanding of map control and precise use of utility, such as smokes, flashbangs, and Molotov cocktails. The balance of power can shift quickly, especially in Banana, where teams often fight for early control.
Controlling key areas like Banana, Mid, and Apartments opens up more options for rotations and executes.
Setting up control gives you more room to maneuver in three cornerstone zones: Banana, Middle, and Apartments.
CT-Side Strategies
The standard CT setup usually has 2 players on B (one at Coffins, one at Arch/CT), 1 player at Mid, and 2 players on A (Short and Balcony/Library). This setup allows defenders to respond quickly to pushes while holding crucial angles.
On B, one player holds Close positions like Coffins or Dark, while the other covers Arch or CT. Smokes on Banana and molotovs on B Ramp or Coffins can slow down enemy pushes and isolate attackers. Controlling Banana with utility and keeping one AWPer on Arch or Cubby is key for early information and support.
The Mid player acts as a rotator and information gatherer, helping both sites efficiently. Long A can be dangerous if the enemy has a sniper, so approaching via Toilets is often safer unless your team has an AWPer covering Long.
T-Side Strategies
T-side rounds often start with 2 players taking control of Banana, 1 player holding Top Mid (Library), and 2 players moving through Apartments (upper or balcony) to pressure A Site). Controlling Banana early allows Ts to apply map pressure and open rotations.
Once Banana and Top Mid are under control, several options open up:
- A split execute: 3 players push Long, 1 goes Short, and 1 through Apartments
- A Short push: most players concentrate on Short with additional support from Apartments
- B split: 3 players push CT to B while 2 push Banana
- A fake from Mid followed by a full B execute with utility to isolate defenders
Nuke: Strategies and Key Locations
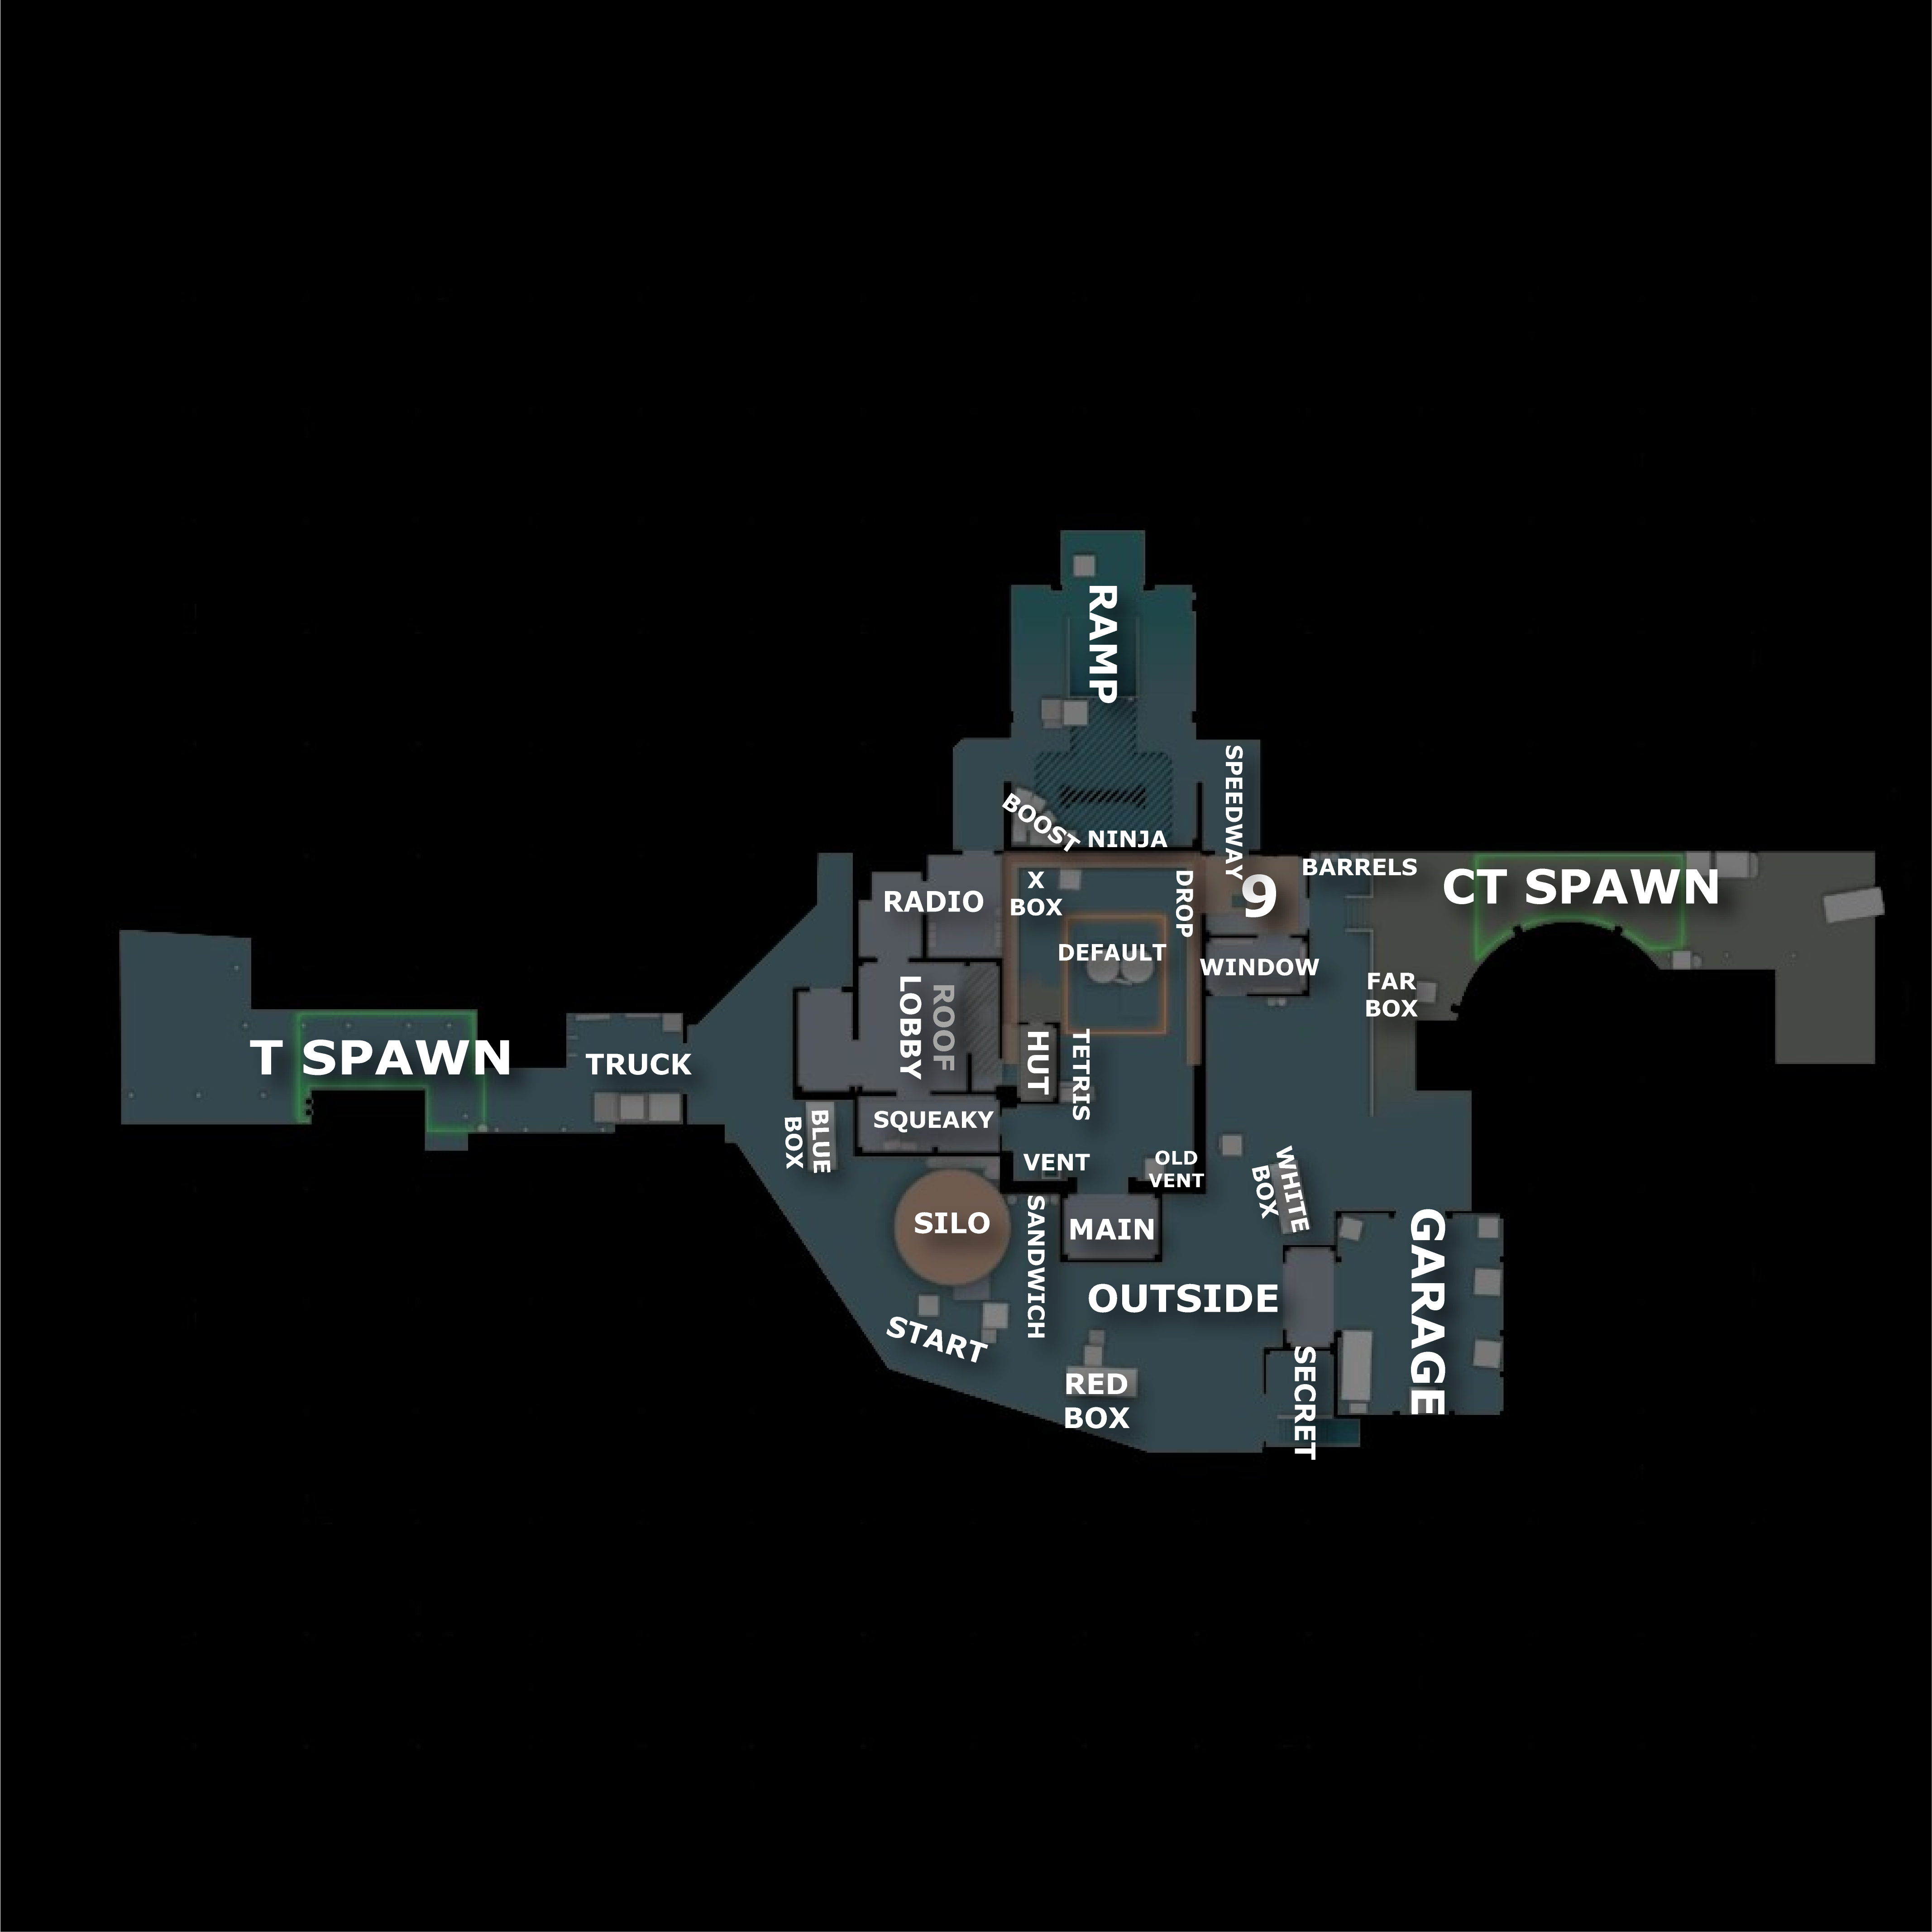
The Nuke map in CS2 is complex and requires mastery of key points such as T-Spawn, A and B Sites, CT-Spawn, and vital areas like Outside, Ramp, Lobby, and Secret to navigate and execute strategies successfully.
CT-Side Strategies
CT-Spawn serves as a key rotation point, allowing defenders to quickly support either site. Near A Site, the Big Box and Hut provide important cover for holding or retaking the site. Other critical positions for CTs include Heaven, A Ramp, B Ramp, Vent, and Back Vent, which allow defenders to control lines of sight and respond to pushes effectively.
CTs often use smokes on Ramp and Outside to slow enemy advances and molotovs on B Ramp or Hut to block entries and isolate attackers. Coordinated use of utility in these areas can repel early T pushes. The Connector/Heaven player is the main rotator and information gatherer, helping to support both sites efficiently. Long sightlines outside make Long A dangerous if the enemy has an AWPer, so it’s often safer to approach via Toilets unless you have a strong sniper on your team.
As a CT, the most critical Nuke CS2 Callouts are:
- Outside
- Lobby
- A Main
- A Ramp
- B Bottom Ramp
- B Doors
- B Window
- B Vent
- B Back Vent
T-Side Strategies
T-Spawn is the starting point for Ts, giving them multiple options to approach either site. Gaining control of Outside, Lobby, or Secret early allows terrorists to open pathways to A or B and apply pressure on defenders.
Garage provides a pathway to influence Outside and challenge A Main, while Ramp and Lobby are common routes for attacking B Site. Coordinating smokes and molotovs for Hut, Heaven, and Vent can isolate defenders and make the B Site easier to take.
Open areas like Outside and Secret require careful timing and teamwork to avoid being picked off by CTs holding Heaven or Ramp. Knowing where defenders are likely to be lets Ts push safely and secure control of B for a successful plant.
You can just practice with a friend one-on-one, here's a guide: How to Play 1v1 in CS2? Servers and Commands.
Ancient: Strategies and Key Locations
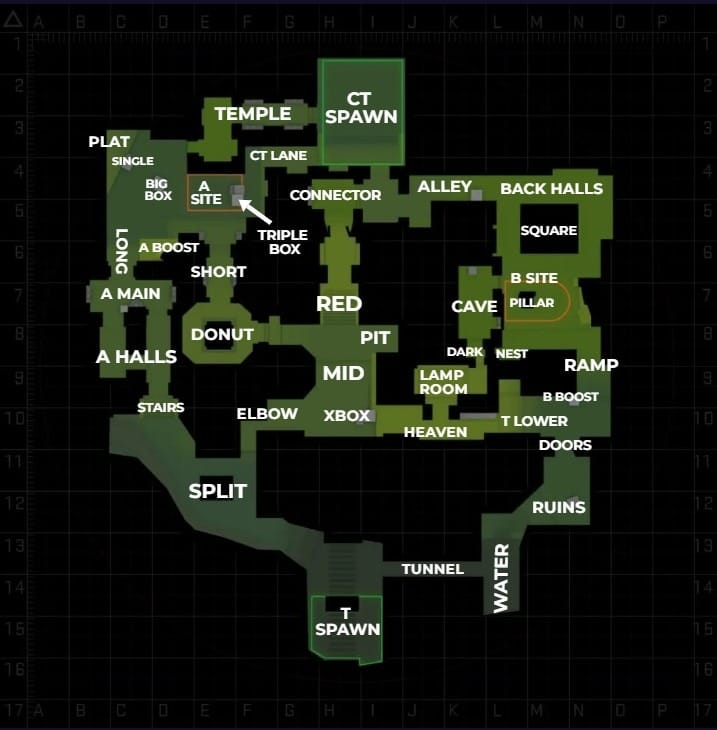
The Ancient map for CS created back in 2020, didn't cause a surge of excitement in the community, but it caught the attention of longtime fans who remembered de_aztec in CS 1.6.
CT-Side Strategies
CT Spawn connects to several key points, providing routes to both bomb sites and strategic positions on the map:
- CT Lane: leads from CT Spawn to Point A, providing quick access for defenders.
- Temple: another path from the Special Forces revival point to point A, often used for strategic rotations.
- Snipers Nest: A vantage point above the center allows SWAT to control this critical area.
- Alley: Connects the CT Spawn point to the rear halls and eventually to point B.
T-Side Strategies
T Spawn provides access to several paths for implementing strategies:
- Tunnel: Connects the terrorists' revival point to the water, often used to assault point B.
- Split: Leads to an Elbow and Stairs, giving T access to the Center and Point A.
- Ramp: Directs players to Point B via an extended climb from the T Lower).
Anubis: Strategies and Key Locations
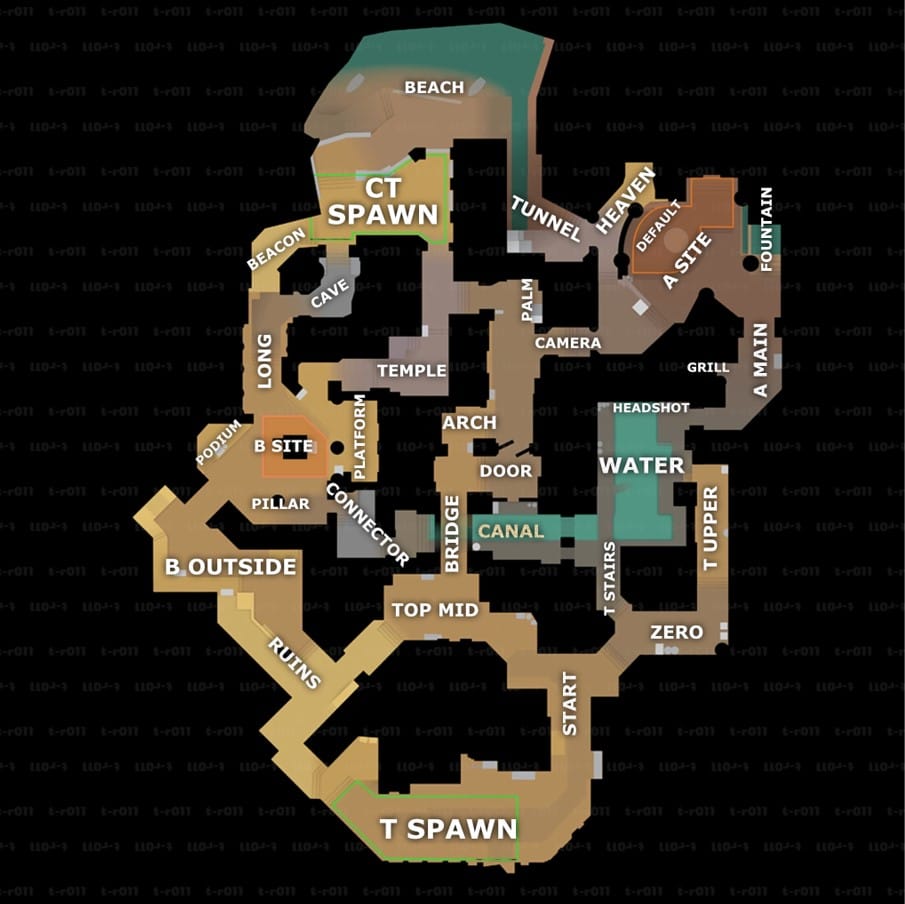
The Season Four Anubis update is all about CT-side balance without removing T-side viability. Teams that adapt fastest—rethinking their utility lineups, adjusting smokes, and mastering the new mid angles—will dominate, while those relying on old habits will be caught off guard.
The middle is the crossroads of Anubis. Controlling this area allows your team to pivot quickly between A and B sites.
Use Bridges and Canals to your advantage, creating opportunities for rotations and ambushes.
Smokes:
- Heaven — blocks vision from above on A
- Bridge — cuts off support from mid
- Connector — blocks rotations from mid
Molotovs:
- B corner — clears common hiding spots
- A default plant spot — forces defenders off the site
Flashes:
- Through A arch
- Into B tunnel
- Over mid
CT-Side Strategies
On the defending side, control of mid remains absolutely critical, especially with the updated geometry. CTs can now hold closer angles at Mid Doors and near the Bridge Drop, making it much harder for T’s to dominate the center early.
On A-site, defenders need to use the repositioned crate and new scaffolding effectively, taking elevated angles without overexposing themselves to pushes from A Main or Catwalk.
At B-site, holding positions at Bombsite B and Garden allows CTs to slow down T advances, while the new E-box hole lets a second player support the site with grenades safely from behind. Successful CT teams adapt quickly to enemy movements, gather information from mid, and rotate fluidly between sites, using utility to delay and punish T-side aggression while maximizing the advantages offered by the new layout.
T-Side Strategies
For attackers, controlling the middle early is essential to opening options on both bombsites. Smokes and flashes are used to block CT vision and neutralize AWPer positions, particularly at Mid Doors and the approaches to A-site.
The updated crate and scaffolding on A-site demand careful attention; defenders may now hold unexpected elevated angles that can punish poorly timed pushes. On B-site, a combination of smoke, molotovs, and coordinated movement through Mid and Main gives T’s a chance to establish map control and threaten flanks.
Flexibility is key: T-side teams need to adapt to new mid timings, account for the reoriented lines of sight, and coordinate utility to keep defenders off balance while maintaining the ability to rotate quickly between A and B.
Smokes:
- A arch — slows down rushes
- Bridge and mid — controls visibility
- B main — blocks vision during entry
Molotovs:
- Connector — stops flanks
- Anti-rush molotovs — used on long or main depending on info
Retake Utility:
- Smokes for Heaven, Connector, and Help
- Molotovs for Pillar, Backsite, and Ninja position
In addition to the official maps, there are also community maps. Read more about them: What are CS2 Community Servers? How to Connect and Why You Should Play on Them.
Dust II: Strategies and Key Locations
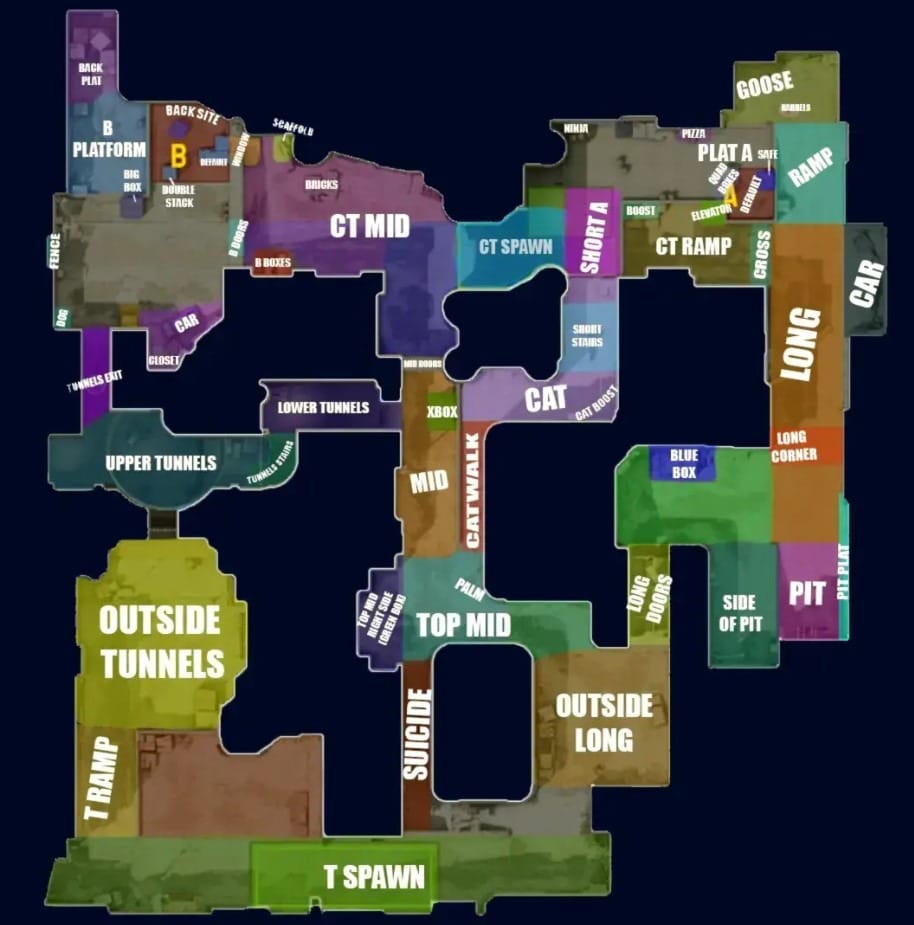
CT-Side Strategies
A popular spot for CTs to hold is the Cross, offering a clear line of sight and sufficient cover.
Another crucial location on A Site is the Elevator or Short Boost, which provides opportunities for strategic boosts and surprise attacks.
There is a spot on A Site in Counter-Strike called Goose, named after one of the game's original creators, Minh Le "Goose." This spot provides cover and is commonly used to defend against incoming attacks.
Additionally, a Ninja spot on A Site is ideal for Ninja defuses and can surprise the enemy team.
A solid default on CT side is the 3-1-1 setup, with three players controlling Long, one on B, and one in Mid, allowing flexible rotations based on early info. You can also play aggressively by pushing Mid and Lower Tunnels to gather info or catch enemies off guard, though it comes with higher risk. In certain situations, a B triple stack can be very effective, especially against teams that favor fast B hits or during eco rounds.
T-Side Strategies
Let's discuss the main strategies. The first, of course, is the legendary Rush B! All you need is smoke in the Windows and Doors, plus a couple of flashes overhead.
There is another strategy - a slow exit to point A. First, one player goes to control the Upper and Lower tunnels. The other four players try to take the Long cover the long.
After successfully taking Longcovering, only two players can play anywhere in the area and show no signs of life. The other two throw smoke on the x-box, summoning a player from the tunnel.
It is essential for players in the tunnels not to give away their presence but to check the Lower tunnel and stay there; they will play the lurking player, taking out enemies from the back.
You do not need to take Lcover alone in the mid to late round. Just leave one player behind the car to control the push and cover Mid any way you can.
Ideally, leave at least one player in the Upper tunnel.
Overpass: Strategies and Key Locations
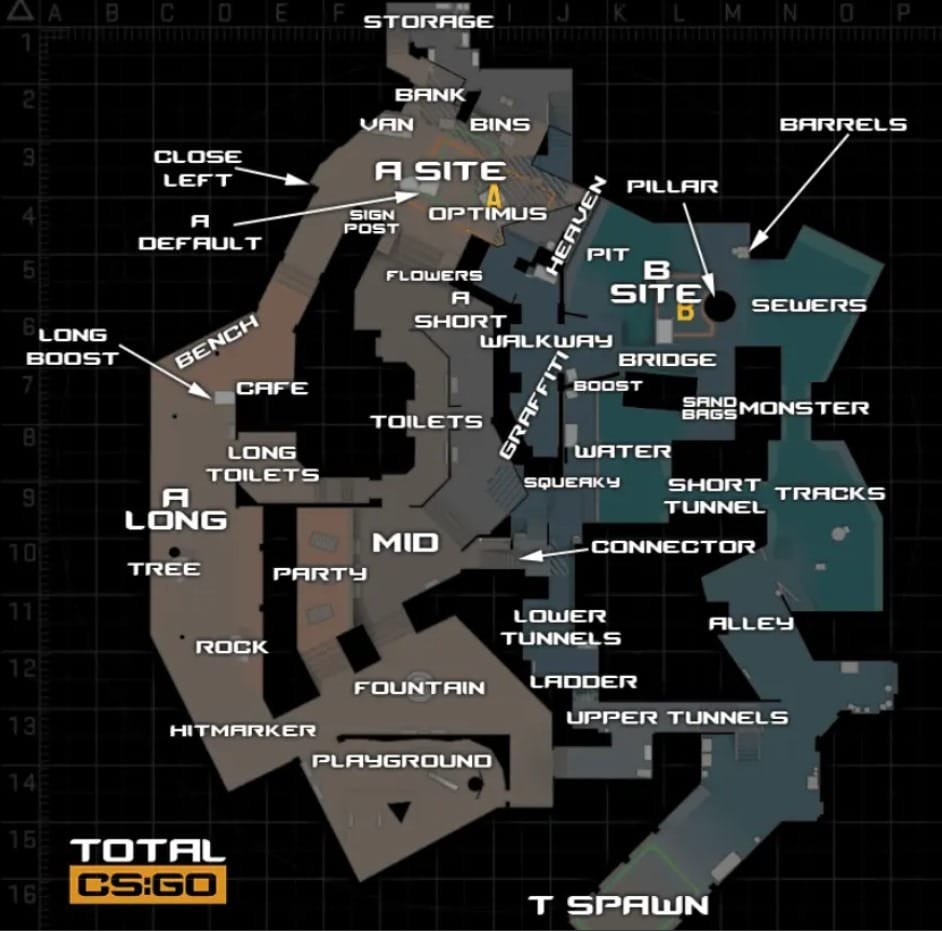
The Overpass is a unique map known for its open spaces and verticality rather than just two levels, with A and B bomb sites offering multiple approaches and angles. The key areas to control are Mid, Playground, Water, Connector, and Bathrooms, as holding these positions allows a team to influence the flow of the round and respond quickly to enemy movements.
CT-Side Strategies
The standard setup for CTs involves 2 players on B (one at Car/Window, one at Platform/Playground), 1 player in Monster/Short, 1 player at Mid, and 1 player on A (Long/Toilets). This setup ensures that both sites are defended while allowing fast rotations based on the information you gather.
CTs often use smokes on Monster to block enemy pushes and molotovs on B Default/Playground to isolate attackers. Controlling these spots with utility can give a decisive advantage early in the round. Aggressive but coordinated use of flashes and molotovs in Monster and Short B can stop early pushes before the Ts gain map control.
The Connector player is a key rotator and information gatherer, helping to support both sites effectively. Long A is particularly dangerous if the enemy has a sniper, so unless you have an AWPer on your team, it’s safer to approach Long via Toilets or let another player hold the angle.
T-Side Strategies
Ts usually spread players across Playground/Water, B Short, Connector, and A Long/Toilets to gain initial control and test CT positions. Gaining control of Connector early is crucial, as it allows quick rotations to either site and opens up opportunities for splits. Expanding control toward Bathrooms or Water helps create angles for smokes and molotovs that can isolate defenders.
For example, smoking Heaven and Bridge on B while molotoving Default/Water isolates defenders, giving the Ts a clear path to plant the bomb and take control of the site. Coordinated pushes from these positions often catch CTs off guard, especially when Connector control enables a fast rotation to punish overextended defenders.
FAQ
What Maps are in the CS2 Competitive Pool?
The maps currently available in competitive mode are Dust II, Mirage, Anubis, Overpass, Ancient, Inferno, Nuke.
How Often Does the CS2 Map Pool Change?
The CS2 competitive map pool doesn’t change on a fixed schedule, but Valve updates it periodically with major patches and new Premier seasons.
In practice, significant changes usually happen a few times a year. For example, in early 2026, Valve removed Train from the Active Duty pool and brought back Anubis, reflecting both competitive trends and map balance adjustments.
How Do Professional Players Adapt To Map Pool Changes in CS2?
Some players are eager to adapt and learn new strategies on the added maps, while others express concerns about potential imbalances or overplayed strategies.